The Fort

The Fort is an immersive experience with the intention of encouraging user connection.  The idea comes from Skylar Jessen who I partnered with for this project.  I assisted with creating the code to help make his idea come to life.

The Fort uses the CLM Trackr to take the facial expression of each user and use it as the base color for the bottom gradient.  The top part of the gradient uses the volume of the two users’ vocal interaction.  The bottom part uses individual’s happiness level for the cover. A third element was added for surprise.  The surprise is attached to the opacity so it tints the image.

All of this will be projected on a fort to create an intimate experience and encourage the users to focus on one another rather than the technology.

Screen Shot 2015-12-18 at 10.05.03 PM


ICM: Week 8- Sweater Weather

This week I have not been feeling well and decided to use this as my inspiration.  I am still learning when to bring a sweater or not.  Therefore, I bring you Sweater Weather.

Sweater Weather

If your city is below 70 Degrees F, it will tell you to bring a sweater:

Sweater Weather - NYC

If you are lucky enough to be in the warmth, it will tell you to leave it:

Sweater Weather - Cancun

Similar ideas to this are Swacket and IsTheLTrainFucked.

PComp: Week 6 – Serial and P5

This week we combined our Arduino and P5.  The labs gave me a lot of difficulty at first.  I had multiple issues from P5 freezing or quitting unexpectingly to the graphing lab not working because I didn’t plug in the wires but the most frustrating thing about this lab is that it will work and then suddenly not work.  By that, I mean that I was able to get the graphing lab to work (see video below) then I would simply close the window to rerun the program and it would not work.  Is this due to the delay in the arduino? Does it need to be longer?

Graphing with P5 and Arduino from Lindsey Frances on Vimeo.


I tried to be a little more ambitious and connect my ICM assignment this week with this assignment.  The original P5 looks like the below video.  I tried to change the first slider which changes the x value of the bezier and creates a different type of “wing.”

Butterflies from Lindsey Frances on Vimeo.

Here is my code and my video of the application in use is:

Butterflies with Potentiometer from Lindsey Frances on Vimeo.

I ran out of time to do this but I wanted to add a second potentiometer to control the y-values.  Would I be able to do this by using the same Arduino code and just adding a second variable or would I have to do something in addition?

ICM: Week 7 – DOM

This week we learned about DOM elements.  For inspiration I used Moon’s workshop example.

Moving Triangle from Lindsey Frances on Vimeo.

After manipulating it a little, I created what looks like abstract butterflies.  Then I added some sliders and buttons to change the colors.  I tried to create a slider to change the amount of “butterflies” but found that since that for loop was in the setup, I couldn’t get it to work.  Would I have to make another function in order to do this?

Butterflies from Lindsey Frances on Vimeo.

Questions:

  • Is there a reason it is more useful to put HTML and CSS elements in the Javascript file than having them in their own individual files?
  • Is there a way to have font from an HTML element put behind an JS element?
  • Can the font style be put together in one style function rather than multiple lines?

ICM: Week 5 – Galaxies and Synthesis

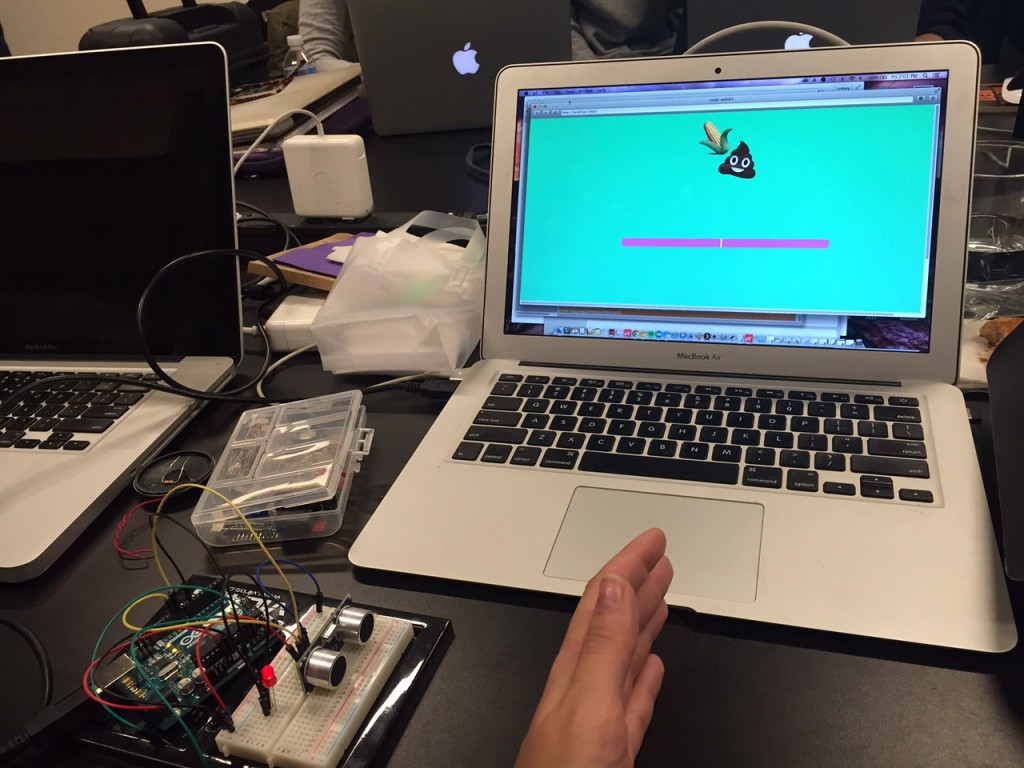
This week was a two-parter.  The first part was the Synthesis Event.  During this, we partnered up to make a one button system.  For our idea, we were going to make a pick-up line machine that was triggered by a proximity sensor.  Unfortunately, we could not get our system to work.  At the end, the farthest we got was the proximity sensor to give one pick-up line but we couldn’t get it to go through random ones.  I think if we had a little more time, we would have been able to finish it.  It was a great lesson.

Synthesis Project


In the second part of this week, we learned about constructor functions.  For this my intention was to create a galaxy.  My first iteration looked more like a tornado.  While, I think it looks beautiful, it wasn’t what I was going for.

Galaxy Tornado from Lindsey Frances on Vimeo.


My second attempt was a little closer once I decided to use the equation for a hyperbolic spiral but it was too structured and circular:

Circular Galaxy from Lindsey Frances on Vimeo.


After being shown that I can have the angle in the hyperbolic equation be my main variable and use that as the parameter in my for loop, I was able to mess around by adding a spiral function to finally get the galaxy that I wanted:

Galaxy from Lindsey Frances on Vimeo.


The step I couldn’t figure out was how to repeat it after a certain point.  I did learn that if I square the angle for the x in the spiral function, I got an interesting vertical line pattern that moved as if it was coming toward the screen: Square Cosine

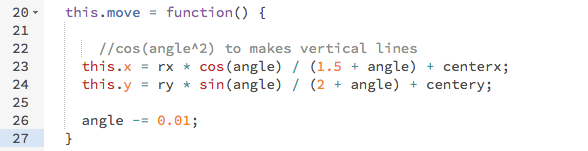
Vertical Lines from Lindsey Frances on Vimeo.


Question: What is the best method to restart an object’s function?


ICM: Week 4

In the beginning of this class, we were told that if we didn’t understand the topic then we can say that in our blog post. Well, today is the day that I use that card.  I just don’t get it.  I understand how to create a function and how to call it and I also understand the examples given in the videos on creating a function within an object. What I don’t get is how to do this with my design.  All I wanted to do was create a image where clouds would move in different directions and “morph” into different shapes. I can do this by calling out my image function within a for loop that’s in the draw function.  If I move this for loop into a new function, it just doesn’t work.  What am I doing wrong?  Also, how can I have different changing variables for each parameter (not just using the “i” and “x” variables with different multipliers)?

Screen Shot 2015-09-30 at 9.04.43 AM


Here is my image.

ICM: Week 3 -Trading Code

This week’s assignment was to code a page with sliders and switch it with a partner.  We decided that since space was both an interest we would create a space shuttle dashboard.  For mine, I essentially create an image mover and zoomer with an added tint effect.

In switching codes, the biggest realization for me was how important it was for my program to be clean and organized.  I tried to make sure to clearly label each section and indent when necessary so that my partner had an idea of what I was trying to do.  This also helped me as I went along because it became easier to know where things are that needed to change.  Also, it was easier to combine different aspects of my code with my partner’s.

The hardest part of this week was figuring out how to change the tint of the picture. When I used the tint function and had variables setup for each color value, it didn’t seem to work because the tint function was in “function draw().”  Using the examples located on the p5.js website, it showed that the tint function was used in the setup only.  Although I did really want to use this method to vary the tint, I knew that by creating an opacity of the image and then varying the background I could create the same effect. Overall for my program, I created what I envisioned from the start and am happy with the result, even though I would still like to know how the tint function worked.  Here and below is my final result and here is the added tint buttons to my partner’s.

Collaboration Assignment

Questions:

  1. Can the tint function work inside the draw function so that it can be varied?
  2. Why does the tint function slow down the frame rate and make the page not load? Is this due to too big of a picture size.


ICM: Week 2

This week’s assignment required the three following parts:

  • One element controlled by the mouse.
  • One element that changes over time, independently of the mouse.
  • One element that is different every time you run the sketch.

The most difficult part of this was the random function when using a bezier.  I wanted to create waves that were randomly placed but kept ending up with exaggerated waves when I made the cooridinates random within the bezier function.  I finally determined that the best way was to use translate and create those parameters as random with the limits of the “ocean.”

In addition, I was having difficulty creating clouds that would load at different y-values. When I randomized the y-coordinates, the cloud animated up and down as seen below:

Cloud-Y-Varying

After messing around with the placement of the line “cloud1.y = random(0, 250),” I found that if I placed it in setup then it would only change when the page was refreshed.  This reinstated the idea that the setup function is only loading once while the draw function is constantly reloading.

Cloud-Height_Varying


In the end, I made a monochromatic seascape that can be seen below:

ICM: First Impressions

After messing around with p5.js, I can say that my first impression of ICM is definitely a good one. I am most excited about seeing what can be done once we get in a little deeper.

To get more familiar with this language, I tried to add the basic shapes from the reference guide in my picture.  Each shape became easier to add until I got to the Bezier and Curve functions.  I found that the Curve function confused me because of the order of each parameter.  In my mind, it is more intuitive for the first and last parameters to be the start and stop points rather than control points. Once that was understood, it was easier to experiment with. However, I would like to know how I could create lines along the planet without just knowing exact coordinates.

ICM Week 1: Spaceship Adventure

The most exciting find was using the randomSeed function.  I wanted to add background stars but decided it was too tedious to put the coordinates in one by one.  As I was messing around with the various random functions, I found that if I put randomSeed(i), it was cause the “stars” to move around the page in an animated fashion.

Code : Randomizing Stars

Although, I am pretty happy with the results, I still have a few basic questions:

1. How can shapes be grouped together? Is there a way to “subtract” shapes from each other?

2. How can an object move across a page?